Monday, September 7, 2009

Wedding Day Table decorations

With the daughters wedding just around the corner, I was trying to come up with ideas to decorate a few tables. I need some centerpieces. While perusing the shelves in the thrift store a week before the wedding, I happened upon these little gems. There were 4 of them, but I only needed three.
At .25 cents a piece, I couldn't resist, especially knowing this wedding was being held outside and should any breeze show itself, candles would not stay lit. These proved the perfect solution.


I rummaged through my craft room and came out with these objects. Silver beads, a string of tiny fake pearls, some white mini silk roses and very very pale yellow (almost antique white) ribbon and finally some thin white satin ribbon. I had the makings of something good here, I was sure of it!


Remembering that 'good design' leaves things in odd numbers, I decided just what to do. I measured the ribbon to reach around the 'waisted' ends of each 'chimney'. Turned it under and hot glued it in place. I strung the thin white ribbon onto the needle and added a silver bead and a small knot at each end. (two of these) Then, I cut a piece of fake pearls the same length as the ribbons giving me 'three' pieces, an odd number. Each one was hot glued to the center of each waisted top, making sure the bottoms of my 'dangles' fell just below the largest part of the belly of the chimney.

I cut the stem from the silk rose, close enough to give me a fairly flat back and hot glued these over the dangles to cover up where they were glued. Added the candle and WOWSA..looky looky!


Here's all three standing in a row like little soldiers.


Don't think JUST 'wedding' when you look at these, change the colors and think fall, or Halloween or Christmas, heck, with the right colors you could even think Easter! Give the thrift store a try as a jumping board for decorations. You may discover something that everyone will LOVE!
Here is one of the treasures on the cake table at the wedding. It was perfect. The other two were on the dinning table.
Give creative crafting a try, you just might like it!
Total cost for these little gems, about 2$ each including the candle! Can't beat that for wedding table decorations!
See ya next time...
Sage, the Hedgewife

Sunday, September 6, 2009

Welcome to Wedding Cake blues!

Well here we were, down to the wire and it's cake baking day. Day one: bake the cake and put on what the professionals call 'the crumb' layer of icing.
Day Two: (the day before the wedding for me since it was to be a 'morning weddng, I would have NO time to decorate and do this, it had to be done the night before.)
This is for all those who are 'first time decorators'..so you can see the way I did it. Is it perfect? No.
Was it a good cake? Yes.
Did the decorations turn out ok? You decide. Here's the finished product.
Click on any picture for a closer view!


Let's begin at the beginning: Day One;


Using my dry 'kitchen only' brush to dust off the crumbs. A big plate of icing and a waiting cake.


Plop it on top and start spreading. This layer needs to be pretty thin, it's a simple coating that you will let sit overnight to get a 'crust' on the icing. It keeps the crumbs underneath so they don't mix with the final coat of frosting and gives you a good smooth surface to work on.


Both cakes with the crumb layer done. HINT HINT HINT: Both of these cakes were turned upside down before the icing began. It's a much more level surface, so ..start on the bottom!
Day Two;
Time for the final layer of icing and the decorations. This needs to be done on the plate you'll be servng it on (unless you trust yourself to move the entire cake after decorating..I did not!) So I used a cake cardboard, covered it in several layers of yellow tissue paper then added the gold foil doily. I used wax paper and made small sections that would cover the doily and keep it protected from the icing. Each piece was pulled out carefully after I had finished decorating.


I used a plastic storage bag, the coupler and a star tip only. Yep..I practiced on the plate a bunch before I started on the cake.

The cake was placed in the center of my 'cake plate' and the icing and decorating began. A bud vase added to the center as this was what I intended to use for the riser for the top layer.

Use a good bit of icing and add big dollops of it along the top. Start spreading trying to keep about 1/4 to 1/2 inch layer of icing under your spreader. Roll the extra icing to the top edge of the cake and down onto the sides, spreading it there as well. Add extra icing where you need it.

Get it as smooth as you can and as level as possible. Here's the fun part. If you want a 'smooth' look (without using a fondant) get a dry napkin or paper towel. No, I'm not joking. I seen this little hint on the net and couldnt' believe it, so I figured I'd try it. Very nervously I put the napkin on the top of the cake and smoothed it with my hand very lightly.

I pulled back the napkin to peek, expecting all the icing to come off with the napkin. WOW! IT didn't and look, it will smooth it out and leave a small print from the design on the napkin! HOW COOL IS THAT?? So I began, doing it with more confidence and pressure and down onto the sides.
And here's what I got. There were some uneven places, where I may have put more or less pressure, but wow, the cake was smooth and pretty level! I was impressed!


After playing with the technique for a bit, both cakes were done, both were as level as I was willing to 'play' with and well, I was happy with the results. I took my first breath in an hour, put everything aside for about 1/2 hour giving everything some breathing room, including me.


Next I started the piping, using the star tip I stayed around the top edge. Pulled out the wax paper, did the bottom edge and then added the stars to the center of the cake. Repeat for both cakes. I added the bride and groom, piped around their bottom and well, scroll back to the top and take a look.

Pretty good huh??

So there's some hints and tips for ya on how to do a wedding cake for yourself or your daughter or friends. Enjoy and I hope you have fun! Make one just to experiement!

See ya next time..down on the farm!
Sage

Ok, here we are again

If you've kept up with the main page "Sagewood Farm" then you know, we've been busy with cake baking, wedding decorations and the 'I do's' around here!

This was not my first adventure in cake baking, and SIMPLE decorating..like "Happy Birthday" written on the top, but this was my first adventure into something a bit more elaborate. I'm sure many of you know to buy a cake from a professional can cost you ENORMOUS amounts of money and since the economy is the way it is we certainly didn't want to spend a good portion of our budget on a cake, I decided to 'make' the girlchilds wedding cake.
I already had a fantastic cake recipe, (one that withstands freezing, is firm but moist and is just the best recipe) so now all I had to do was 'learn to decorate', at least the little tips and tricks. I searched the 'net', studied up on it a bit and yep, sure did learn a few things.

So with recipe in hand, let the adventure begin!
PREP WORK:
Let all ingredients get to room temperature.
Preheat oven to 325 °
Butter and flour your pans. (Use a one tube pan or 4 loaf pans)
Mix all dry ingredients.
*I also used waxed paper on the bottom of the tube pan. (allow small cut sections to come up on the sides. This prevents any batter from escaping out of the cracks in the pan!)

*I'm doing this recipe twice here, once in a tube pan for the cake bottom, and one in a small souffle dish for the small cake at the top. The loaf pan is for the extra batter on cake #2.

Now, for the recipe:

Wanda's Butter Pound Cake

1 C. butter, softened
2 1/2 C. Sugar
6 eggs (separated)
3. C. plain flour
1/2 t. baking soda
8 oz. sour cream
1 tsp. vanilla
1 tsp. lemon (optional)
1/2 C. Sugar
Cream butter and sugar


Add egg yolks, one at a time, mixing between additions.


I put the eggs in a separate bowl, pick up the yolk carefully, the transfer the white to my 'mixing' bowl, putting the yolk in my batter then mix. Repeat for all 6 eggs.
Combine all dry ingredients in separate bowl. Add dry ingredients one cup at a time, alternating with sour cream, mixing after each addition. Add vanilla and lemon (if using). Mix well.


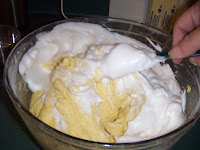
Beat the egg whites till stiff, but not dry. Adding in the 1/2 C of sugar, one T. at a time. Fold egg whites into batter.


Fill tube pan and bake for 90 mins in center of oven.


** hints and tips:

This cake is a bit twitchy to opening the door of the oven, so you know what?? DON'T! Stomping around the kitchen is not recommended either, this cake WILL fall! (ask me how I know this!)

So..if you don't beat and bang about the kitchen, this is what you should have when you're done.
Ok..there ya go. Cool in the pan, then transfer to a wire rack to finish cooling.

This cake does NOT need icing, trust me! HOWEVER, since I used this for a wedding cake, next comes the icing of course!

Classic Butter Cream Icing
Here's what I do to make a 'semi stiff stable' pipable frosting.
1 C. Butter to 1 bag of powdered sugar.
1tsp. vanilla to each bag of sugar. I do add a touch of lemon flavoring to 'tone down' the sweetness.
Mix well!
Let butter come to room temperature (very soft). Blend butter, add powdered sugar 1 cup at a time, mixing as you go till the icing is smooth. Add vanilla, mix again. This recipe does NOT need any liquid. It keeps it more stable in 'warm summer' temperatures and makes for good 'decorator' icing on speciality cakes. :) HOWEVER..if you find it is too stiff, add cream or milk, 1 Tsp at a time until it's the consistency you desire.
ENJOY!!
NEXT post: Icing and decorating tips and tricks I used!

Saturday, September 5, 2009

The day has come and gone

And as you can see from above, the wedding was the 'must do' for the day. All went off without a hitch, we even started within 15 minutes of our original time! (how cool is that?!)

Everyone had a fabulous time, the Bride and Groom were lovely and both beautiful! (although the best man was too cute!) I hope you enjoy this short montage of our big day. Soon, I'll be posting pictures on The Hedgewife soon of some of the crafts, cake making and decorating and wedding dress making!! Enjoy!!

See ya next time......down on the farm!

Sage